Showing posts with label sea foam green. Show all posts

Saturday, August 13, 2016

Harmen Jazz Bass. Some improvements.

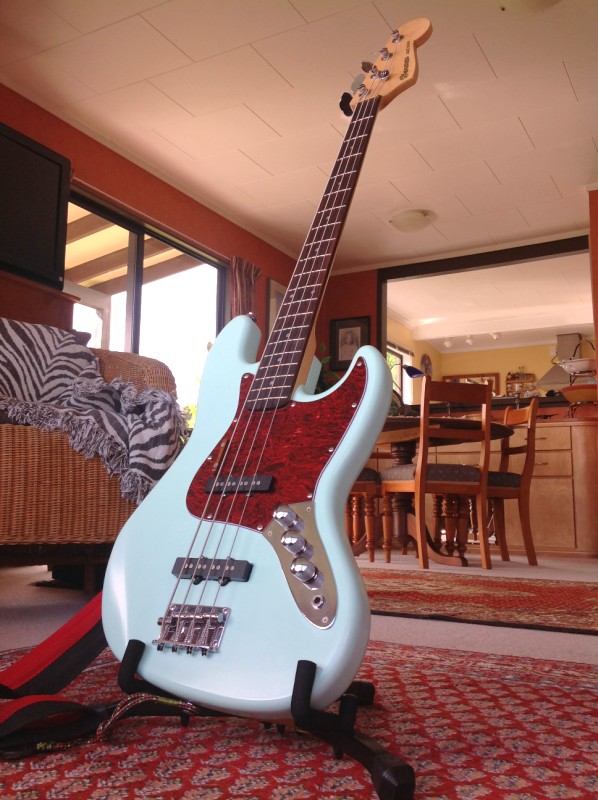
New and improved. Seymour Duncan Vintage pick ups, new pots and tone capacitor, fresh paint, new logo and head stock colour.
It's been a while.

Over time I've been watching and feeling my jazz bass mature. As a novice player, slowly accumulating knowledge experience and muscle memory, I'm began to realise that I could make some improvements to my home made instrument. Aside from cosmetics which I have addressed during the upgrade, I decided to improve the electronics. I did a great deal of reading on the subject and there is much to learn. The potentiometers that came with the basic parts kit for my bass build were of the cheapest quality. They are 250k mini pots marked with the letters CF. I eventually settled on Bourn branded pots. These are logarithmic, good quality, 25 mm diameter, carbon disc units which are of a medium price range at $6.80 each from RS Electronics. The other upgrade I decided on was the replacement of the tone capacitor. It seems that this capacitor is a very important item when it comes to sound quality from your electric bass guitar. It has something to do with the way in which the signal frequency from the pickups gets carried to earth as the tone pot is rotated. The capacitor that I chose is a Russian made, bipolar, .047uf, 100 volt, paper in oil which are manufactured for military use. These are supplied by The Tone Lounge an online guitar spares company at $12.99.

The last two weeks of spare time was spent repainting and upgrading my instrument. I favour the 1960's look Fender Jazz which featured a painted headstock. Mine is painted in Sea foam green, a classic '50's and 60's colour, popular on cars and decore from that era, when I was an impressionable child, it's still my favourite colour. the NZ colour equivalent is Vista Blue by Resene Paints. I chose a semigloss acrylic enamel which I rolled on and then sanded back with 1200 wet and dry abrasive paper. lastly I applied 2 coats of Dulux, rattle can, semigloss clear.
I've designed a new logo transfer as well which has gone on to the headstock. It has received the same coat of clear before I fitted the machine heads, restrung and then lastly, the final set up, string height and intonation. Fun project!

Saturday, May 4, 2013

Harmen's Jazz bass project.

My Jazz bass is already well used, I love this instrument, it's the first electric bass that I've owned and played, the experts tell me it plays as well as a genuine Fender!

Mmmm, Seafoam green my favourite colour, brilliant contrast with the faux tortoise shell pick guard. It's odd though that the camera seems unable to capture the true colour, these images read as light blue to my eye. Those of you with an eye for detail will notice my custom thumb support above the E string, on the pick guard. I've developed a playing position dictated by my Taylor AB1 which has an extension horn, thumb rest on the finger board. The thumb rest is made from a piece of  high density, heart teak screwed on with the same type of  screws as those that fasten the pick guard.

The strap is a modified fashion accessory, black and red nylon webbing with my customized extensions of sailors cord. The Tiki on my strap is a plastic one that I have kept since 1971 when my family traveled to Europe. We flew some of the way on an Air New Zealand DC8. This Tiki was in the pack of give aways the airline presented to us children on the flight.

Strings are Martin Darco Electric Bass Guitar Strings, D9700L Light Gauge, Nickel wound.


I can have some fun with the head stock can't I? This one is customized with an old 30's Marconi radio cadet's badge depicting 3 soaring gulls in blue and white enamel on brass.


Monday, June 4, 2012

Harmen's new Jazz bass project completed

My new home built kit, Jazz Bass 


Today I finished assembling my new bass guitar.
I spent some time screening all the cavities in the body prior to fitting the electronics. I chose to use aluminium foil from some pie dishes obtained from our local store. I cut and fitted each piece of foil to shape, and set them in place with double sided tape. The wiring cavities I shielded by rolling foil around the stem of my Philips screw driver to create tubes which linked both the pickup cavities with the control assembly cavity. It was a simple matter to slip these tubes into the predrilled holes and terminate each end by cutting tabs into the protruding ends of each tube and folding these back against the shielding in the cavities.

I found that after assembling and doing a rough set up yesterday that the neck needed to be set back a little  to get the string action into the right range. I downloaded a PDF from the Fender website which turned out to be an absolutely brilliant reference for me during the dry run and final set up.
I fitted a .5mm shim in the lower end of the neck pocket and screwed the neck firmly in place.
I then fed the strings through the saddle and adjusted the intonation of each string with the help of my Boss tuner. They were all a bit flat so I unscrewed the adjusters until I achieved a true octave from open to the twelfth fret.
Next I set up the action, adjusting the string heights at the saddle and measuring the clearance at the 17th fret. After this came the pickup height adjustment, a simple matter of turning the four height adjustment screws..

I then re tuned the guitar and went up to our studio and switched on my beautiful 1961, Jansen 50 Bassman valve amp and plugged in my new guitar.

 My 1961 Jansen 50 Bassman valve amp and quad box.

You can't imagine my delight at what came out! It sounds just like a bought one. My new bass feels amazing, solid and positive to the touch. It really is incredible to me that a group of inanimate objects, assembled in the right way, with some care and attention to detail can produce such a quality instrument. YAY!

I finished the guitar body in Sanding sealer then automotive primer (Grey) followed by several coats of water based enamel each coat was sprayed with a small  De Vilbis  touch up spray gun.
The neck got two coats of sanding sealer, and 4 of semi gloss polyurethane varnish applied by spray gun as well.
The fret board is finished in 3 coats of Danish oil applied by brush and wiped back with a cloth.

My semi rigid, bass guitar carry bag arrived from Lenker Music also by courier.
It's constructed from 600 denier nylon, closes wit a heavy duty zipper. The padding is high density polystyrene with a black velvet liner. It's lightweight and very durable.

I made a guitar strap from an old webbing belt to which I hand stitched some synthetic braided spectra line.

Harmen


Saturday, June 2, 2012

Kitset "Jazz" Bass guitar project


I recently won an auction for a Guitar Spares kitset "Jazz" style electric, solid body bass guitar. It came by courier in a cardboard box.


This is what the components look like straight out of the box
All the parts come with the kit and all the pick up and control cavities are routed out.
Headstock cut out all ready for 
sanding sealer.

This is the Jazz bass model I've long admired so here's my opportunity to replicate one.

I've loved Sea foam green as a guitar colour since I was very young so I found a similar colour in a local paint supplier's range that they call "Vista Blue". Sealer, primer and one 
topcoat on.
Trial balance of elements and set out 
logo design. I think that the tortoise shell pick guard looks amazing against the green paint finish.


.
My custom head stock scroll design is slightly larger than Fender's and closer to a double bass scroll profile.

Head stock varnished, I used a gold paint pen to write the script for my "Harmen JAZZ BASS" logo outlined with a fine black paint pen.


Second coat of semi gloss water based  enamel. Beautiful still weather for painting!

This Jazz Bass kit project has been one of the most satisfying that I have undertaken in quite a while. I've loved researching the various processes on line, finding some great links and tips to assist me with my build. The scale of this project has suited me too. I've had to call on many of the skills that I have acquired over my lifetime, I chose materials and processes that would cause me and the environment minimal damage.
I chose to do this because I could not find an instrument of the quality and characteristics that I wanted for the budget I had available. All in all I'm very happy with the result so far, more later.

Harmen